Dissection 014
Fun ghosts in the C1 machine
Original essay: Seven Revolutions
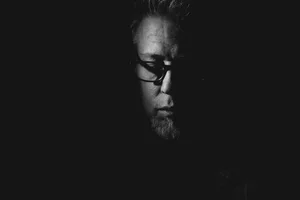
Did any of you wonder about the image above? In particular, where the ghost-like structure in the centre came from? It could be part of the original capture, but it isn’t. If you’re thinking double-exposure now, you’re close, but not quite there. This was, in fact, created entirely inside of Capture One 21.
I’m calling this brush glitching.
“Glitching is an activity in which a person finds and exploits flaws or glitches in video games to achieve something that was not intended by the game designers.
”
I’ll be writing about the new Magic Brush in the next couple of weeks because it’s a tool I now use extensively. It’s become one of those foundational changes that very rarely comes along. But this post, however, is more of a fun sidebar.
I was processing a series of images for a new project (not the ones in this post), copying and pasting settings from one image to another. It’s something I do constantly to maintain uniformity, especially after changes have been made to an original Style. Except this time, something went wrong: after applying the settings, a grid appeared, overlaid on top of the new picture. “Great, another f%$ bug…”, I thought. But then I noticed a layer, sitting there. And then I remembered using the Magic Brush.
And then the lightbulb went off.
The grid pattern was, in fact, the windows of a building structure I’d masked on the previous shot, superimposed. I ran a few quick tests and, sure enough, it worked every time. For this particular picture, I used a mask from the following image in the set:

The patio door handle

The mask
I brushed two strokes on the door handle, copied the layer (and only the layer), pasted to my destination. Then, I simply adjusted the settings on the new mask layer (tweaking mostly brightness and shadows), until I was happy with the way it looked.
I’m fairly confident this “glitch” has existed as long as masks have been around in the app. The difference is that previous masking functions wouldn’t have been precise enough to make any results interesting. The Magic Brush’s power lies in its ability to draw extremely complex masks, with varying opacity, very quickly. One or two strokes is usually all it takes if you get the brush settings correctly.
The important thing to remember is that we’re still working with a mask, which means that:
It’s grayscale.
It’s behaving as an overlay, with either the white or the black areas punching through.
Parts of it can be erased, but…
…erasing will erase the pattern as well. Something to keep in mind. It won’t be possible to simply brush it back in as easily as a solid area mask.
This is also all happening on an individual layer, which means a) we have control over the overlay’s general opacity, and b) all the usual tools are available.
Here’s another example, step by step:

Original mask to be copied.

The mask, pasted to a second image.

Settings adjusted on the layer mask.

Final result: additional tweaking of the settings + parts of the mask have been erased.
Look, I haven’t discovered a hidden Photoshop inside C1 (which is why I think glitching is an appropriate term for it). But if the conditions happen to be right…why not?
Creating is discovery.
Creating is play.